Chilli jam scallops with asian greens

makes 4 servings

WHAT YOU NEED
  •     2 bunches Chinese broccoli (gai lan), trimmed, cut into 6cm lengths
  •     20 scallops without roe
  •     1 1/2 tablespoons chilli jam*
  •     2 teaspoons olive oil
  •     1 small onion, thinly sliced
  •     2 teaspoons light soy sauce

HOW TO PREPARE
  1. Steam the Chinese broccoli, covered, over a large saucepan of boiling water for 2-3 minutes until just tender. Drain and set aside.
  2. Meanwhile, toss the scallops with 1 tablespoon of the chilli jam. Heat a frypan over medium-high heat and add 1 teaspoon of the olive oil. When hot, add the scallops and pan-fry for 1 minute on each side until just cooked. Remove from the frypan and cover to keep warm.
  3. Add remaining teaspoon of oil to pan and reduce heat to medium. Add onion and cook for 3-4 minutes until softened. Add remaining 1/2 tablespoon chilli jam and broccoli, tossing to coat. Remove from heat and stir in soy.
  4. Serve vegetables in bowls with scallops.
 
NOTES: Chilli jam is available from Asian food shops and selected supermarkets.

Chocolaty Peanut Butter Truffles

WHAT YOU NEED
  •     3 tablespoon butter (salted or unsalted), softened
  •     1/2 cup creamy peanut butter
  •     3/4 cup powdered sugar
  •     1 1/4 cup semi-sweet chocolate chips
  •     1 tablespoon shortening, optional
  •     1/4 cup milk chocolate chips
  •     1 teaspoon shortening, optional

HOW TO PREPARE
 Line a baking sheet with wax paper.
 
  1.  In a medium bowl, mix together butter and peanut butter until well combined. Incorporate powdered sugar and mix really well until a smooth dough forms. Form dough into 24 balls (about 1 1/2 tablespoons of dough per ball) and place on the prepared baking sheet. Place baking sheet into the fridge and let chill for 30 minutes (or 15 minutes in the freezer).
  2. Meanwhile, melt semi-sweet chocolate chips and 1 tablespoon shortening, if using, in the microwave or with the help of a double boiler.
  3. Remove peanut butter balls from the fridge and dunk one ball at-a-time into the melted chocolate. I use a fork to flip over the ball in the chocolate to make sure it's evenly coated. After that, I tap the fork gently against the side of the bowl to let excess chocolate drip off and transfer the coated truffle back to the baking sheet. Repeat with all balls. Place back into fridge for 10 minutes.
  4. Melt milk chocolate and 1 teaspoon shortening and remove truffles from the fridge. Using a fork, sprinkle each truffle with melted chocolate. Place truffles back into the fridge for at least 15 minutes or until set. Enjoy!

NOTES
Chocolaty Peanut Butter Truffles will keep up to 1 week in in an airtight container in your fridge or up to four weeks in an airtight container in your freezer.
 

Truffles taste best when kept in the fridge and should not sit out for more than 10 minutes before serving.
 

This recipe can easily be doubled.
 

Mixing shortening with the melted chocolate helps the chocolate to stay smooth, which is easier to work with and gives the finished truffles are more professional look.


Meatloaf Lasagna

makes 8 servings

WHAT YOU NEED
  • Kosher salt
  • 8 sheets dried lasagna noodles (about 6 ounces)
  • 1 tablespoons olive oil, plus more for tossing and greasing
  • 2 cloves garlic, 1 thinly sliced and 1 finely grated
  • Pinch crushed red pepper flakes
  • One 14-ounce can whole peeled plum tomatoes, crushed by hand
  • 2 to 3 fresh basil sprigs
  • 5 slices bacon
  • 12 ounces ground beef chuck
  • 12 ounces ground pork
  • 1 cup plain dried breadcrumbs
  • 1/2 small yellow onion, grated
  • 1/4 cup chopped fresh parsley, plus more for garnish
  • 1 tablespoon tomato paste
  • 1 tablespoon Worcestershire sauce
  • 2 large eggs
  • Freshly ground black pepper
  • 2 cups shredded part-skim mozzarella
  • 1/4 cup grated Parmesan
  • Ricotta, for serving

HOW TO PREPARE
Bring a large pot of salted water to a boil. Add the lasagna noodles and cook until al dente. Drain and toss with olive oil, to keep them from sticking, and let cool.

Meanwhile, make the tomato sauce. Heat the oil, sliced garlic, red pepper flakes and 1/2 teaspoon salt in a large skillet over medium heat. Stir as the oil heats up; once it shimmers, add the crushed tomatoes, 3/4 cup water and the basil. Bring to a high simmer and cook, stirring occasionally, until the sauce thickens slightly and the water has evaporated, 15 to 20 minutes (will be about 1 cup). Remove from the heat and let cool to room temperature.

Arrange the bacon in a large skillet and cook over medium heat until brown and crispy, 4 to 5 minutes per side. Remove and finely chop when cool enough to handle.

Combine the bacon, beef, pork, breadcrumbs, onion, parsley, grated garlic, tomato paste, Worcestershire sauce, eggs, 1 1/2 teaspoon salt and 1/2 teaspoon black pepper in a large bowl. Use your hands to thoroughly combine.

Adjust an oven rack to the middle position and preheat to 350 degrees F. Line a rimmed baking sheet with foil and brush with oil. Combine the mozzarella and Parmesan.

Shape half of the meatloaf mixture into a 9- by 5-inch rectangle in the center of the prepared baking sheet. Make a slight indentation down the center and fill with 1/2 cup of the cheese mixture. Top with the remaining meatloaf mixture and pat to form a loaf with a slightly rounded top, making sure to pinch and seal the sides.

Top the meatloaf with one-third of the sauce and sprinkle with one-third of the remaining cheese mixture. Lay 4 lasagna noodles, crosswise and slightly overlapping, over the meatloaf, completely covering. Top with another one-third each of sauce and cheese mixture. Repeat with the remaining noodles, sauce and cheese.

Bake until the meatloaf reaches an internal temperature of 165 degrees F, 40 to 45 minutes. Sprinkle with parsley and let cool slightly. Slice and serve with dollops of ricotta.


Udon with Tofu and Asian Greens


makes 4 servings


WHAT YOU NEED
  • 1 8 -ounce package udon noodles
  • 4 tablespoons roasted peanut oil, or 3 tablespoons sesame oil mixed with 1 tablespoon vegetable oil
  • 1 12 -ounce package firm tofu, cut into 12 pieces
  • Kosher salt and freshly ground pepper
  • 1 11 -ounce package Asian cooking greens or baby spinach
  • 1 bunch scallions, thinly sliced diagonally
  • Large pinch of red pepper flakes
  • 3 tablespoons soy sauce
  • Pinch of sugar 


HOW TO PREPARE
Cook the udon noodles as the label directs. (Don't overcook or they will get mushy.) Drain, reserving about 1/3 cup of the cooking water.

Meanwhile, heat 2 tablespoons oil in a medium skillet over medium heat. Pat the tofu dry and season all over with salt and pepper. Add the tofu to the skillet and sear until golden brown, about 2 minutes per side. Set aside and keep warm.

Add 1 tablespoon oil and the greens to the skillet. Cook, tossing, until just wilted. Add the scallions, red pepper flakes, the remaining 1 tablespoon oil, the soy sauce and sugar. Add the reserved cooking water; heat to create a broth. Divide the noodles and greens among 4 bowls and top with th
e tofu.

Crab, Avocado and Sweet Chilli Sauce Bites


WHAT YOU NEED
  • 3 crabs, steamed (I used Blue Swimmer crabs)
  • 1 large avocado
  • 1 lemon, juiced
  • 1 packet water crackers (a thin, light cracker suits this dish)
  • 1 tub cream cheese
  • Sweet chilli sauce
  • Salt flakes and freshly ground black pepper (optional)

HOW TO PREPARE
  1. Remove crab meat from shells (see my previous posts on catching and cooking crabs).
  2. Peel avocado, remove stone and cut into two. Cut each half into two lengthways and then slice across the avocado to create small triangles.
  3. Brush avocado pieces gently with lemon juice (a silicon brush is perfect for this). This adds flavor and also helps prevent the avocado from discoloring.
  4. Place water crackers on a plate or plates.
  5. Spread with cream cheese and top with avocado and crab meat. Spoon over sweet chilli sauce.

NOTES
  1. Best served immediately otherwise the crackers will get soft.
  2. Makes around 30 crackers.
  3. Serves 4-6 as an appetizer.
  4. If you don't like crab you could substitute freshly cooked prawns. I'd buy King Prawns and allow one per cracker.


Bloomin’ Onion Bread


makes 6-8 servings

WHAT YOU NEED
  • 1/2 cup butter, melted
  • 1/2 cup green onion, finely diced
  • 1/2 cup green onion, finely diced
  • 2 teaspoons poppy seeds 

HOW TO PREPARE
  1. Preheat oven to 350 degrees Fahrenheit.
  2. Cut the bread lengthwise and width-wise without cutting through the bottom crust. This can be a little tricky going the second way but the bread is very forgiving.
  3. Place on a foil-lined baking sheet.
  4. Insert cheese slices between cuts.
  5. Combine melted butter, garlic, onion, and poppy seeds. Pour over bread.
  6. Wrap in foil; place on a baking sheet.
  7. Bake at 350 degrees Fahrenheit for 15 minutes.
  8. Unwrap the bread and bake 10 more minutes, or until cheese is bubbling

Asian greens and shiitake mushrooms


makes 6 servings

WHAT YOU NEED
  • 2 tbs peanut oil
  • 2 garlic cloves, crushed
  • 2 tsp finely grated fresh ginger
  • 100g fresh shiitake mushrooms, thinly sliced
  • 1 bunch baby pak choy, trimmed, leaves separated, stems cut from leaves
  • 1 bunch baby bok choy, trimmed
  • 1 x 425g can baby corn spears, drained
  • 2 tbs oyster sauce
  • 2 tbs oyster sauce
  • 2 tbs water

HOW TO PREPARE
  •  Heat oil in a large frying pan or wok over medium-high heat. Add garlic and ginger. Stir-fry for 30 seconds or until aromatic.
  • Add the mushroom and stir-fry for 2 minutes. Add the pak choy stems and stir-fry for        1 minute. Add the pak choy leaves, buk choy, corn, oyster sauce and soy sauce. Toss   to combine.
  • Add the water and reduce heat to low. Cover and cook for 2 minutes or until the vegetables are just tender. Serve.
 
NOTE: Time-saving tip ~ To save time, prepare the garlic, ginger and vegetables up to 3hours ahead. Store in an airtight container in the fridge.

Healthy Banana Bran Muffins


makes 24 muffins 

WHAT YOU NEED
  • 2 tablespoons butter, softened
  • 1/3 cup applesauce
  • 1/2 cup granulated sugar
  • 2 large eggs
  • 3 medium ripe bananas, mashed
  • 1/2 cup buttermilk
  • 1 1/2 cups all purpose flour
  • 1 1/2 teaspoons baking soda
  • 1/2 teaspoon salt
  • 4 cups bran flakes
  • 1 cup miniature semisweet chocolate chips

HOW TO PREPARE
  1. Preheat the oven to 350 degrees F.  
  2. In a large mixing bowl, cream together the butter, applesauce and sugar. Add the eggs, bananas and buttermilk and mix well. Add the flour, baking soda, salt, bran flakes and chocolate chips. Mix just until evenly moistened. The batter will be lumpy with a few dry streaks. 
  3. Fill greased or paper-lined muffin cups 2/3 full. Bake for 16-18 minutes until a toothpick comes out clean. Remove to a wire rack to cool completely. Store the muffins in an airtight container for 1-3 days or freeze in a resealable freezer bag or airtight container for up to a month.

Pumpkin Chocolate Ice Cream Sandwiches


makes about 20-24 ice cream sandwiches

WHAT YOU NEED
  • 1 (15-ounce) can solid pack pumpkin (not pie filling)
  • 1 cup (2 sticks) butter, softened to room temperature
  • 1 1/2 cups granulated sugar
  • 1/2 cup packed light brown sugar
  • 2 large eggs
  • 1 teaspoon vanilla
  • 1/2 cup cocoa powder
  • 3 3/4 cups all-purpose flour
  • 2 teaspoons baking powder
  • 2 teaspoons pumpkin pie spice (see below for a homemade version)
  • 1/2 teaspoon salt
  • 1/2 to 1 cup mini chocolate chips
  • Quart of good-quality vanilla ice cream (may not use it all)

HOW TO PREPARE
  1. Preheat the oven to 350 degrees F.  
  2. In a small bowl, whisk together the cocoa powder, flour, baking powder, pumpkin pie spice and salt. Set aside. 
  3. In a large bowl, combine the pumpkin, butter, granulated and brown sugar. Beat with an electric mixer (or in the bowl of an electric stand mixer) on medium speed until well blended. Add the eggs and vanilla and mix for 1-2 minutes.  
  4. Stir in the flour mixture until combined. 
  5. Drop the cookie batter by heaping tablespoonfuls onto lined (with silpat or parchment) baking sheets. Bake 14-15 minutes. Remove the cookies from the oven and press down on them while they are still hot with a flat-bottomed glass until they are about 1/4- to 1/2-inch thick. Remove to a wire rack to cool completely and repeat with the remaining dough.  
  6. Once the cookies have cooled completely, place the mini chocolate chips in a shallow dish or bowl. Place a heaping spoonful (about 3 tablespoons or so) of ice cream on the bottom of a cookie. Press the flat side of another cookie into the ice cream. Quickly, so the ice cream doesn't melt too much, roll the edge of the ice cream sandwich in the mini chocolate chips (this is messy and if the chocolate chips are falling off, try pressing them into the sides with your fingers). Immediately place in the freezer while you proceed with the remaining cookies and ice cream. 
  7. Freeze for at least 2-3 hours or overnight. If desired, wrap each cookie in plastic wrap for longer storage.  
  8. If you don’t have pumpkin pie spice, use the following combination: 1 teaspoon cinnamon, 1/2 teaspoon ginger and 1/4 teaspoon nutmeg and 1/4 teaspoon cloves. Mix together and you have 2 teaspoons pumpkin pie spice.

Homemade Thin Mint Cookies


 makes about 3 dozen cookies

WHAT YOU NEED
  • 1 cup all-purpose flour, plus more for surface
  • 1/2 cup unsweetened Dutch-process cocoa powder or natural cocoa powder (see note)
  • 1/2 teaspoon baking soda
  • 1/2 teaspoon baking powder
  • 1/2 teaspoon salt
  • 5 tablespoons butter, softened
  • 3/4 cup granulated sugar
  • 1 large egg
  • 1 large egg yolk
  • 3/4 teaspoon pure peppermint extract
  • Peppermint candies, crushed (optional)
  • 2 pounds white or dark chocolate, coarsely chopped (or a combination if you want to dip some in white chocolate and the rest in dark)

HOW TO PREPARE
  1. Preheat the oven to 325 degrees. 
  2. In a small bowl, whisk together the flour, cocoa powder, baking soda, baking powder, and salt.  
  3. In a medium bowl (or the bowl of an electric stand mixer), beat the butter and sugar with a mixer on medium-high speed for 1 minute. Reduce the speed to medium-low and add the egg and egg yolk. Mix well. Beat in the peppermint extract. 
  4. Slowly add the flour mixture, and beat until just incorporated. Shape the dough into 2 disks, wrap each in plastic, and refrigerate until firm, at least 1 hour (or up to 2 days).  
  5. Roll out 1 disk of dough on a lightly floured surface to 1/8-inch thickness, more or less. Using a 2-inch round cutter, cut out circles and place 1-inch apart on parchment-lined baking sheets. Roll and cut the scraps once or twice (the cookies will be a bit more dry with each rerolling). Freeze the tray of cookies until firm, about 15 minutes. Repeat with the remaining disk of dough and freeze also. 
  6. Bake the frozen cookie rounds until they are dry to the touch, about 12-14 minutes. It's really important to bake them all the way through so they are crisp and not soft.  
  7. Transfer the baked cookies to a wire rack to cool completely. The undipped cookies will keep well , covered, for up to 3 days. 
  8. Melt the chocolate in a heatproof bowl in the microwave or in a double boiler on the stove. I like to melt it in the microwave at 1-minute intervals at 50% power, stirring in between. Melt the white and dark chocolate separately, if using both.  
  9. Dunk the cooled cookies into the melted chocolate, one at a time. Using a fork, press lightly on the cookie until completely submerged in the chocolate. Pick up the cookie with the fork, let the excess chocolate drip off, and gently scrape bottom against edge of bowl. Using the flat edge of a knife or another fork, gently push the cookies onto parchment or wax paper. Sprinkle with crushed candy if using. Let the cookies sit until the chocolate has hardened, an hour or so (you can refrigerate to speed up this process). 
  10. The dipped cookies will keep covered in the refrigerator for up to a week or in the freezer for up to a month.

The Best Ground Beef Tacos


makes 4-6 servings

WHAT YOU NEED
  • 2 tablespoons canola oil
  • 3/4 cup chopped onion
  • 1 pound ground beef or ground turkey
  • 1 to 3 garlic cloves
  • 1 tablespoon chili powder
  • 2 teaspoons ground cumin
  • 2 teaspoons ground coriander
  • 1/2 teaspoon salt
  • 1/2 teaspoon pepper
  • 1 (8-ounce) can tomato sauce
  • 1 jalapeno, seeded and minced fine (alternately, you can add hot pepper sauce to taste or canned jalapenos OR just leave out the heat altogether, although I think the meat really needs a little kick and adding the jalapeno without seeds didn't make the dish overly spicy)
  • Taco shells
  • Additional taco garnishes

HOW TO PREPARE
  1. In a large skillet over medium heat, add the oil and chopped onion. Cook, stirring often, until the onion is softened, about 4-5 minutes. Add the ground beef and cook, breaking up the meat into smaller chunks, until it is cooked through, about 5 minutes. Off the heat, drain the grease from the meat. 
  2. Return the skillet to the heat and stir in the garlic, chili powder, cumin, coriander, salt and pepper. Cook for about 30 seconds and then add the tomato sauce and jalapeno. Turn the heat to low and simmer the meat mixture for about 10 minutes, stirring occasionally. Serve in taco shells with your choice of toppings.

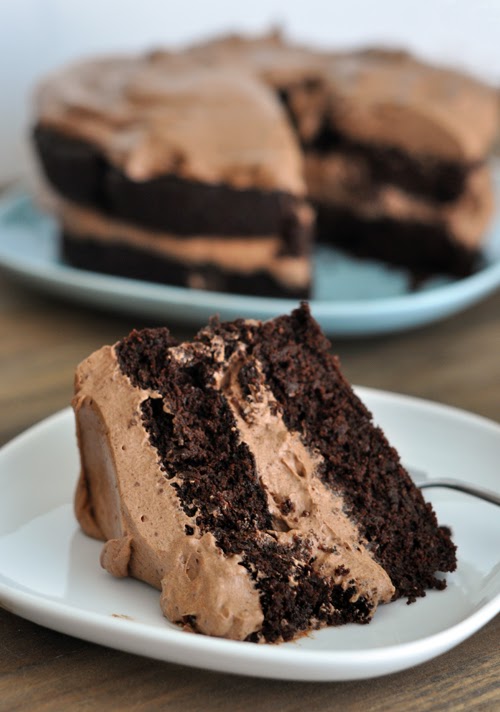
Decadent Chocolate Cake with Whipped Chocolate Frosting


makes 12 servings

WHAT YOU NEED
     
    Cake
  • 2 cups cooked and cooled quinoa (see note above)
  • 1/3 cup milk
  • 4 large eggs
  • 1 teaspoon pure vanilla extract
  • 3/4 cup butter, melted and cooled
  • 1 1/2 cups granulated sugar
  • 1 cup unsweetened cocoa powder
  • 1 1/2 teaspoons baking powder
  • 1/2 teaspoon baking soda
  • 1/2 teaspoon salt
  •  
    Frosting
  • 2 1/4 cups heavy whipping cream
  • 1 1/4 cups semisweet or bittersweet chocolate chips

HOW TO PREPARE
  1. For the cake, preheat the oven to 350 degrees F. Lightly grease two 8-inch round cake pans. Line the bottoms of the pans with parchment paper.  
  2. Combine the milk, eggs and vanilla in a blender or food processor. Process just until combined. Add the cooked quinoa and the butter. Blend well until smooth. 
  3. In a large bowl, whisk together the sugar, cocoa, baking powder, baking soda and salt. Add the contents from the blender and mix with a wooden spoon or whisk until combined.  
  4. Divide the batter evenly between the two pans and bake on a rack in the middle position for 28-30 minutes or until a knife or toothpick inserted in the center comes out clean. Remove the cake from the oven and cool for 10 minutes. Invert the cakes onto cooling racks (remove the parchment paper stuck to the bottom of the cakes). 
  5. For the frosting, place the chocolate chips in a medium bowl. Heat the whipping cream in a saucepan until it gently simmers. Pour the hot cream over the chocolate chips and let the mixture sit for five minutes. Whisk to combine until it is glossy and smooth. Cover the bowl with plastic wrap and refrigerate until completely chilled and cold (2-3 hours). You can speed up this process by placing the bottom of the bowl in an ice water bath and stirring until cool. When fully chilled, use an electric mixer (stand mixer or handheld) to whip the mixture to soft peaks.  
  6. Place one cake layer upside down on a serving platter or plate. Top with a generous portion (about half) of the whipped frosting, spreading to within 1/2-inch of the edge of the cake (it will press to the edge when the top cake layer is put on). 
  7. Gently put the other cake layer upside down on top of the frosted layer. Spread the remaining frosting over the top of the cake. You could definitely frost the sides, too, but I like the more rustic look for this cake - frosting just the middle and top.  
  8. Chill the frosted cake in the refrigerator for at least 2 hours before serving to let the frosting set up a bit. 

NOTE: You'll need about 1/2 cup (maybe a bit more) dry quinoa for 2 cups cooked. Make sure to measure the quinoa for the cake recipe after it is cooked and cooled. Also, make sure to cook the quinoa in water not broth.

Grilled Honey Chicken and Veggie Kebabs


makes 6 servings

WHAT YOU NEED
  • 1/2 cup low-sodium soy sauce
  • 1/2 cup honey
  • 1/2 teaspoon black pepper
  • 2 cloves garlic, finely minced
  • 1/3 cup vegetable or canola oil
  • 2 1/2 pounds chicken breasts, cubed
  • 2 red bell peppers, cored, seeded and cut into large pieces
  • 1 large red onion, cut into large pieces
  • 8 ounces white button mushrooms, stemmed
  • 2-3 cups fresh pineapple chunks

HOW TO PREPARE
  1. In a large bowl, whisk together the soy sauce, honey, pepper, garlic and oil. Measure out 1/4 cup marinade and place in a covered container in the refrigerator to use for grilling. Place the cubed chicken in a large ziploc bag and the vegetables in another ziploc bag. Pour half of the remaining marinade over the chicken and the other half over the vegetables. Seal the bags and refrigerate for at least 2 hours (can be refrigerated up to 24 hours). 
  2. If using wooden skewers, soak them in water 30 minutes prior to cooking. Thread the chicken pieces onto skewers and alternate the veggies/fruit on separate skewers.  
  3. Preheat a grill to medium heat and grill the skewers, flipping every couple of minutes, until the chicken is cooked through (about 7-10 minutes total, depending on the heat of your grill and size of the chicken pieces). The vegetable skewers only need a few minutes per side. Use the reserved marinade to brush over the chicken and veggies during the final minutes of cooking. Serve immediately.


Heavenly Blueberry and Cream Angel Dessert


makes 8 servings

WHAT YOU NEED
    Blueberry Filling
  • 12 ounces frozen blueberries
  • 2 tablespoons granulated sugar
  • 2 tablespoons cornstarch
  • 1/4 cup cold water
  • Squeeze of fresh lemon juice (about 1/2 tablespoon)
  •  
    Cake and Cream
  • Baked, cooled and cubed angel food cake (see note)
  • 16 ounces light cream cheese, softened to room temperature
  • 2/3 cup half-and-half or evaporated milk (can use skim evaporated milk)
  • 2/3 cup granulated sugar
  •  
    Whipped Cream
  • 1 1/2 cups heavy cream
  • 3 tablespoons powdered sugar

HOW TO PREPARE
  1. For the blueberry filling, in a medium saucepan, combine the blueberries, sugar, cornstarch, water and lemon juice. Bring the mixture to a simmer and cook until thickened, 5-7 minutes, stirring often. Remove from the heat and let cool to room temperature.  
  2. For the cake and cream layer, in a blender or with an electric mixer (handheld or stand mixer), whip together the cream cheese, half-and-half or evaporated milk and sugar until smooth and creamy. Transfer the mixture to a bowl if you used a blender. Fold in the angel food cake cubes. Keep in mind (from the note above) that you may not use all the cake cubes, especially if using an angel food cake mix. Add cake cubes until they are all thickly coated with a layer of cream. If making this in advance, it can dry out if there is too much angel food cake added. 
  3. For the whipped cream, beat together the heavy cream and powdered sugar until peaks form.  
  4. To assemble, in a trifle dish or in a large glass bowl, spread half of the angel food cake mixture. Top with half of the blueberries, spreading evenly across, and then spread half of the sweetened whipped cream. Repeat the layers. 
  5. Cover and refrigerate at least 2 hours or up to 24 hours. Serve chilled. 


Black Bean Pizza with Whole Wheat Crust


WHAT YOU NEED
     
    Pizza Dough
  • 1 1/2 cups warm water
  • 1 1/2 tablespoons instant yeast
  • 1 1/2 tablespoons sugar
  • 1 1/2 tablespoons oil
  • 1 1/2 teaspoons salt
  • 3-4 cups whole wheat flour
  •  
    Black Bean Mixture
  • 2 (15-ounces each) cans black beans, rinsed and drained
  • 1 tablespoon olive oil
  • Salt to taste
  • 1/4 cup chopped cilantro
  • 1 teaspoon hot sauce 
  • 2 teaspoons cumin 
     
    Toppings
  • 1 medium red bell pepper, seeded and finely chopped
  • 4-5 green onions, finely chopped
  • 1-2 cups shredded sharp cheddar cheese
  • Chopped tomatoes
  • Shredded lettuce
  • Sour cream or ranch for drizzling 

HOW TO PREPARE
  1. Position an oven rack in the lower third of the oven and preheat the oven to 450 degrees F (preheating a pizza stone if you have it; if not, flip a rimmed baking sheet upside down and preheat that instead). In the bowl of a stand mixer fitted with a dough hook (or you can definitely do this the old-fashioned way by hand in a large bowl), combine the water, yeast, sugar, oil and salt. There's no need to proof the yeast if using instant yeast. If you are using active dry yeast, let the mixture stand for 4-5 minutes until the yeast is foaming. Add the flour gradually until a soft dough forms that isn't too sticky to the touch (see the note above). Knead for 3-4 minutes. Cover and set aside while preparing the other ingredients.  
  2. For the bean mixture, in a blender or food processor, combine the beans, oil, salt to taste (start with 1/4 teaspoon and add more to taste), cilantro, hot sauce and cumin. Blend until it reaches the desired consistency. I processed mine until fairly smooth. 
  3. Divide the dough into 2-3 pieces, depending on how big you want your pizzas. Press the dough into a large circle or oval or square (it really doesn't matter) on a piece of greased parchment paper to about 1/4-inch thick. Of course, you can always press into a thicker crust if you'd like. It's really all about your personal preference.  
  4. Divide the bean mixture evenly among the pressed out pizza dough. It won't spread as easily as, say, butter, but using the back of a large spoon or an offset spatula, spread it as best you can. It doesn't have to be perfect. 
  5. Top the bean mixture with a sprinkle of red bell pepper, green onions and cheese.  
  6. Slide the parchment with the pizza on it onto the preheated baking stone or upside down baking sheet.
  7. Bake for 8-12 minutes until the crust is golden and toppings are bubbling. Carefully remove the pizza from the oven and let it cool for 5 minutes or so before serving. Repeat with the remaining pizza(s).  
  8. If desired, top with tomatoes, lettuce and sour cream (or ranch) - otherwise, you can eat it without the extra toppings. Delicious either way.


Creamy Spinach Artichoke Pizza


makes 6 servings

WHAT YOU NEED
  • 1 1/2 cups shredded Asiago cheese
  • 1 1/2 cups diced, cooked chicken
  • 1 package Garlic and Fine Herbs Boursin cheese (5.2 ounce)
  • 1/4 cup minced red onion
  • 1/2 cup chopped marinated artichoke hearts
  • 1/2 cup chopped frozen spinach, thawed and squeezed dry
  • 2 cloves garlic, finely minced
  • Salt and pepper to taste
  • Pizza dough

HOW TO PREPARE
  1. In a medium bowl, combine the chicken, Boursin, onion, artichokes, spinach, garlic, and salt and pepper to taste. Set aside.  
  2. Preheat a grill or baking stone in an oven (see this post for grilling pizza and this post for oven baking). Roll out the pizza dough for one large 12-inch pizza or two smaller pizzas. Using the method for grilling or baking, prepare the dough accordingly (on a baking sheet or parchment paper) and pre-bake one side, if needed for grilling. Spread the filling over the pizza (it's ok if it is chunky in places - this makes more of a rustic-type pizza) and top with the shredded Asiago cheese. Bake or grill until the pizza is browned and the filling is hot. Serve immediately.

Note: This recipe makes 1 large or 2 smaller pizzas. We grilled the pizza but you could also bake it in a hot oven. I used my favorite pizza dough recipe, splitting it in half - half for this pizza and half for a pepperoni for the kids. For the frozen spinach, I thawed a 9 ounce frozen package and ended up adding most of it. If you want it lighter on the spinach, refrigerate the remaining spinach and use it for another meal.

Mint Brownie and Oreo Hot Fudge Trifle


WHAT YOU NEED
     
    Brownies
  • 9X13 pan of brownies, cut into small cubes (see note - you only will use about 3/4 of the pan of brownies)
  • Mint Cream Cheese Whipped Cream:
  • 8 ounces cream cheese, light or regular, softened
  • 3 cups heavy whipping cream
  • 1-2 teaspoons mint extract
  • 1/2 cup powdered sugar 
     
    Oreos and Hot Fudge
  • 25 mint Oreos, coarsely chopped
  • 1/2 - 3/4 cup hot fudge sauce, warmed slightly


HOW TO PREPARE
  1. For the whipped cream, in a large bowl, beat together the softened cream cheese with about 1/2 cup of the whipping cream until the mixture is smooth. Add the mint extract, powdered sugar and the remainder of the whipping cream gradually. Mix on high speed until the cream is whipped and the mixture is very thick and creamy. 
  2. In a glass trifle dish (or large glass bowl), place in 1/3 of the brownies then 1/3 of the whipped cream, spreading evenly to the edges. Next sprinkle in a little more than 1/3 of the Oreos (about 10 chopped) and finally drizzle with 1/3 of the hot fudge sauce.  
  3. Repeat that same layering process two more times (the only difference is that I only used about 4 chopped Oreos for the very final layer - so the first two layers use about 10 chopped Oreos each). 
  4. Chill in the refrigerator until ready to serve. 

Black and White Holiday Bark


makes 25 pieces
 
WHAT YOU NEED
  • 1 pound bittersweet or semisweet chocolate, chopped
  • 1 cup Rice Krispies cereal
  • 3/4 cup dried cranberries, divided
  • 1 pound white chocolate, chopped (do not substitute white chocolate chips!)

HOW TO PREPARE
  1. Line an 8X8-inch or 9X9-inch square baking pan with aluminum foil, allowing the foil to extend over the sides, and set aside. In a medium microwave-safe bowl, microwave all but 2 or 3 tablespoons of the chopped bittersweet or semisweet chocolate at 50% power for 1 minute. Stir, scraping down the sides. Continue microwaving at 30 second intervals, still at 50% power, until small lumps remain. Stir until the chocolate is completely melted and smooth. Spread the chocolate into the prepared pan and chill until firm, about 30 minutes.
  2.  Melt the white chocolate using the same method as the dark chocolate, keeping in mind that white chocolate melts at a lower temperature than dark chocolate so take care not to scorch it. When the white chocolate is completely melted, stir in the rice krispies and 1/2 cup of the cranberries until everything is evenly mixed. Spread this mixture over the chilled chocolate mixture in an even layer. Sprinkle the remaining 1/4 cup cranberries over the top. Chill for 30 minutes, until the white chocolate layer is set.
  3. Melt the 2 or 3 reserved tablespoons of dark chocolate in the microwave and transfer to a small ziploc bag, making sure to pour it all into one corner of the bag. With the pan of bark right in front of you, snip a tiny corner off the bag where the chocolate is and drizzle it over the top of the bark. Let the bark sit for 10 minutes until the drizzle is set. Remove the bark from the pan by lifting up on the foil. Carefully peel the foil away. Cut the bark into squares with a sharp knife. The bark will keep, well-covered, in the refrigerator for up to a week.

Note: If you are not a dark chocolate lover (I'm crying tears for your soul right now), you can try substituting milk chocolate, but I have not tried it and am guessing it will make the total package much, much sweeter so attempt at your own risk. Also, it's very important to use bar white chocolate, not white chocolate chips, as the chips can have serious issues when being melted.


Brownie Batter Truffles


WHAT YOU NEED
  • 3/4 cup unsweetened cocoa powder, Dutch-process or regular (see here for the difference between the two)
  • 1 cup granulated sugar
  • 1/2 cup packed light brown sugar
  • pinch salt
  • 3/4 cup all-purpose flour
  • 2 teaspoon vanilla extract
  • 1 1/2 sticks (12 tablespoons) butter, melted
  • 8-12 ounces chocolate or chocolate bark (candy coating)
  • Sprinkles for garnish

HOW TO PREPARE
  1. In a large bowl, combine the cocoa powder, granulated sugar, brown sugar, salt and flour until it is well combined. Stir in the vanilla and melted butter until the mixture forms a thick batter.
  2. Line a large rimmed baking sheet with waxed or parchment paper. Roll the dough into about 3/4-inch size balls and place them on the wax paper. Refrigerate for about an hour until the brownie batter balls are firm.
  3. Prepare another large baking sheet lined with parchment or wax paper. Melt the chocolate or candy coating according to package directions (I usually melt either in a microwave-safe bowl at 1-minute increments at 50% power, stirring in between, until melted). Using two forks, plop a truffle into the melted chocolate, submerging it completely. Lift it out with one of the forks and tap the handle of the fork lightly on the edge of the bowl to let the excess chocolate fall through the tines of the fork. Gently lay the fork on the empty baking sheet lined with wax or parchment paper and use the second fork to carefully nudge the truffle off the other fork onto the paper. Repeat with the remaining truffles. Use sprinkles on top of the truffles before the chocolate sets. Refrigerate until ready to serve.

Garlicky Tofu Fried Rice with Japanese Seven Spice


makes 2 servings

WHAT YOU NEED
  • 2 bowls of already cooked brown rice, Japanese rice or Thai jasmine rice (day-old leftover rice is best)
  • Vegetable oil
  • Toasted sesame oil 

  • 1 block extra firm tofu – cut into small cubes
  • 4-5 cloves garlic – finely chopped
  • 1 stalk broccoli – chopped into small florets

  • 1/4 cup sweet corn kernels – fresh or frozen (thawed)

  • 1 tbsp reduced sodium soy sauce
  • 2 tsp Japanese rice wine (optional)
  • 1 tbsp or more of Season with Spice’s Japanese Seven Spice
  • 2-3 scallions – chopped

  • 1 tbsp Season with Spice’s black sesame seeds
  

 HOW TO PREPARE

  1. Heat a wok or frying skillet over medium-high heat, then swirl in one or two teaspoons of vegetable oil to coat. Add in the tofu and pan-fry on one side until firm and crisp. Then turn to cook the other side. At this time, quickly add in garlic chunks, and splashes of soy sauce and toasted sesame oil. Continue to fry until tofu turns golden on all sides. Remove and set aside.
  2. Wipe the wok/skillet with a paper towel to lightly clean. Reheat over medium-high fire, and add in two tablespoons of vegetable oil. Then add broccoli and cook until tender. Add in the rice and stir-fry. You want to really break up any rice chunks that had clumped together in the fridge overnight. When the rice is all evenly heated up (about a minute), add in sweet corn and cooked tofu with garlic, and give it a few quick tosses. When all the ingredients are well mixed, add in the tablespoon of soy sauce and the two teaspoons of Japanese rice wine (if using). Toss again to coat well. Turn heat off.
  3. Generously sprinkle in the Japanese Seven Spice. Garnish with scallions and black sesame seeds. Serve immediately.